HTML Basics
| Site: | Philippine Science High School - MC - Knowledge Hub |
| Course: | SY25.CS3.Web Development |
| Book: | HTML Basics |
| Printed by: | , Guest user |
| Date: | Tuesday, 14 April 2026, 2:41 AM |
Introduction
Welcome to you CS3 Course! CS2 introduced you last year to the world of software development, using C++ as your primary programming language. This year you will take what you a had learned and the skills that you had acquired from your CS2 lessons and apply it to web development. You will be using HTML, CSS, JavaScript and Node.js as your tools in order for you to develop a web site with interactive web pages with capacity to create and maintain perpetual data.
Installation Requirements for this quarter:
Before
you proceed with this module, make sure to install the following software in
your computer if you will be developing your web pages offline:
- Any Internet browser that comes with your computer.
- A text editor. The recommendation for this class is VSCode or Notepad++. You can also explore Atom, Brackets, Sublime and Notepad++. Brackets are especially very convenient to use when you become familiar with the interface.
You can access the Notepad++ downloadable
installer here (https://notepad-plus-plus.org/downloads/). Choose the latest version.
A text editor is where we type and edit our code in and save it as an HTML file with a file extension of .html. These types of files can then be opened with an Internet browser and be viewed as regular web pages rather than code.
If you prefer to not install anything on your computer, you can use online text editors. They are also helpful if you use different computers and installing would be a hassle or is not possible.
Online text editors also execute the code for you and give
you a preview of your output right beside your code. In our course we will be using Replit. Go to https://replit.com/ and using your pshs.edu.ph email account, please create your account there.
Other tools to be installed will be communicated with you when we will be using them already. As of now, the above requirements will suffice for this quarter.
Creating your first HTML document
Open any text editor to type your code in.
Basic HTML Code Structure
Whenever you start creating your code, make it a habit to type in all the basic tags first and then type in all the contents in between later on. The code sample below shows the basic structure of an HTML document
<!DOCTYPE html>
<html>
<head>
<meta charset="utf-8">
<meta name="viewport" content="width=device-width">
<meta name="keywords" content="beginning html, learning,
CS-3, PSHS-MC" />
<meta name="description" content="A web page used for the Web Dev Course in Philippine Science High School - Main Campus" />
<meta name="author" content="Sir Roy" />
<meta name="revised" content="07/17/2023" />
<link rel="icon" href="images/pshslogo.ico" type="image/ico" sizes="16x16"> <!-- to add a site tab icon -->
<link href="style.css" rel="stylesheet" type="text/css" /> <!-- to add an external css file -->
<body>
<h1>Welcome to CS3 Web Development</h1>
</header>
<footer>
<p>© 2023 Computer Science 3</p>
</footer>
<script src="script.js"></script>
</html>
Code Explanation
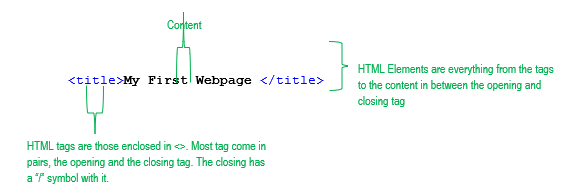
- All the special terms in blue and their contents are called HTML Elements. The entities enclosed in < > symbols are called HTML tags.
- The <!DOCTYPE html> declaration defines that this document is an HTML5 document. This is very important since websites nowadays are coded in multiple languages, aside from HTML.
- The <html> element is the root element of an HTML page. It signifies the beginning of the code.
- The <head> element contains meta information about the HTML page. Everything inside the <head> tag will not be displayed in the main body of the web page.
- The <title> element specifies a title for the HTML page (which is shown in the browser's title bar or in the page's tab)
- The <meta> tags contain all information related to the HTML document such as character typeset, author information, and keywords.
![]() Note:
Practice proper documentation of your outputs. All your coding submissions should contain the proper meta tags.
Note:
Practice proper documentation of your outputs. All your coding submissions should contain the proper meta tags.
- The <link> element is used to connect the current html file to an external source. For the sample code above, the line defines an icon for the web page on the browser tab and the next one is connecting to an external .css file.
- On the other hand the <script> element is used to incorporate a JavaScript (JS) inside your web page, in this example is a connecting to an external .js text file.
- In later parts of CS3, you will learn to use <link> for other types of files.
- The <body> element defines the document's body, and is a container for all the visible contents, such as headings, paragraphs, images, hyperlinks, tables, lists, etc.
- The <!-- --> is the comment tag. Everything inside the tag will not be displayed in the browser.
- When a tag is indented, it means that it is inside the tag preceding it. For example, <title> is inside <head>. The parent of the <title> tag is the <head> tag.
Introduction
In the previous page, you have
learned the basic structure of an HTML code and how to save HTML files. Next, you will learn about some of the ways to place text in your
website.
HTML tags to be discussed is outlined as follows:
- <div>
- <span>
- <h1> to <h6>
- HTML Lists (<ul> and <ol> with <li>)
![]() Note:
All of these tags will be placed
inside the <body> tag.
Note:
All of these tags will be placed
inside the <body> tag.
Before anything else, it is important to know that every HTML element has a default display value, depending on what type of element it is. The display values are block and inline and are discussed below.
- Block – all elements with a block display value will take up the full width available. Any HTML elements after it will begin at the next line

- Inline – all elements with an inline display value will only take up a width equivalent to its content. Any HTML elements after it will immediately be placed beside it. It is important to note that the width of inline elements could not be changed with few exceptions.

Containing and header tags: div, span, h1 to h6
The following are HTML elements with their descriptions and default display value.
The <div> Element
- It is often used to contain other HTML elements and in defining a section of the HTML document.
- It is a block element.
- Enclose all contents of the <div> element with </div>
.
- It can be used to contain text or group together other HTML elements.
The <span> Element
- It can also be used to contain other HTML elements and in defining a section of the HTML document.
- It is an inline element.
- Enclose all contents of the <span> element with </span>
- It can be used to contain text or group together other HTML elements.
Click this to see sample code for span
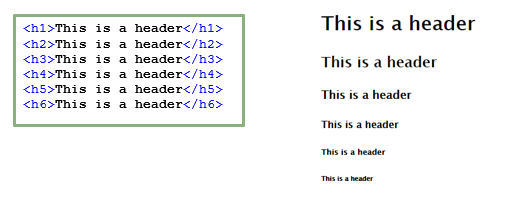
HTML Headers <h1> to <h6>
- Used for titles of new sections
- <h1> is the largest in terms of font size and <h6> is the smallest.
- Header tags are block elements.
- Enclose all contents of the header tags with its corresponding closing tag.
HTML List
- There are two types of list in HTML: ordered and unordered.
- Use of <ol> for defining a list that uses numerical values.
- Use of <ul> for defining a list that uses non-numerical values, or bullets.
- HTML lists are block elements.
- Take note to always enclose all contents of lists with its corresponding closing tag.
- Define each item in the list with. Refer to the example below. Take note of the indentation of to indicate that it is inside the tag preceding it.
