Image Sprites (additional information)
| Site: | Philippine Science High School - MC - Knowledge Hub |
| Course: | SY25.CS3.Web Development |
| Book: | Image Sprites (additional information) |
| Printed by: | , Guest user |
| Date: | Tuesday, 14 April 2026, 2:36 AM |
1. Introduction
After completing this module, you are expected to:
- Enhance web pages by incorporating links styles and events using CSS
- Identify and practice the latest updates in CSS, particularly image sprites.
Graphical elements in websites have become more common to make web pages more appealing and interactive for viewers. Images make web pages come to life and make the appearance of websites more interesting. The downside of using many images on a web page is it makes the loading time slower. Browsers request information from servers to display web pages, and a request only has a specific size limit. Images contribute largely to the file size of the web page. When a web page has a large file size, the browser needs multiple requests from the server to display the whole web page, making the loading time slower.
To reduce the number of requests, web developers combine multiple images into a single image. This resulting large image is called image sprite. It is a combination of many images. Given below are some examples of image sprites:

Figure 1. An image sprite for different icons of social media sites
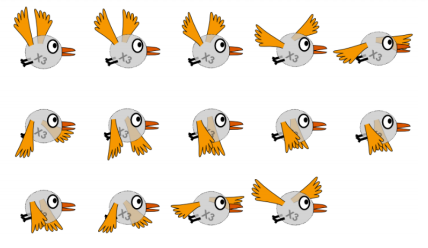
Figure 2. A character at different frame shots of a single movement
Image sprites are used by retrieving a single image and displaying small parts of the image at
a given instance. Let us look at examples of how image sprites are used.
2. Application 1: Using image sprites for icons
Let’s say you have a “Contact Us” section, and there are multiple social media links that the user can click on. Refer to Figure 1 again (filename in this example is icon.png). We want to display only the Facebook icon. We can focus on the Facebook icon by getting the coordinates of the chosen area.
<head>
<style>
.sprite {
background: url('icon.png') no-repeat -182px -91px;
width: 33px;
height: 33px;
}
</style>
</head>
<body>
<div class="sprite"></div>
</body>

Code explanation:
In the code, a div tag is set with class name sprite. The image sprite where the Facebook icon is located is in icon.png. Let us look at this line from the given code above:
background: url('icon.png') no-repeat -182px -91px;
The image is set as the background of the div tag, but instead of having the whole image as the background, the background will start at 182 pixels to the right and 91 pixels down from the top left corner of the image. The top left corner of the image is set at 0px 0px. A negative sign for the first pixel value means it is moving to the right and a negative sign for the second pixel value means it is moving down.
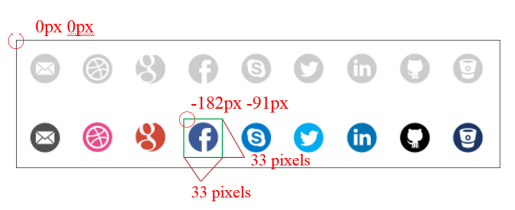
Notice that after this line of CSS code, a width and a height were defined. We have
defined the starting points to be at -182px -91px. The ending points for the image will now be 33
pixels (width value) after -182px to the right and 33 pixels (height value) after -91px down.
3. Determining the pixel values in image sprites
To use image sprites, we must be precise in the values that we need. We must know the exact location of the starting point of the portion of the image that we want to use, and we must also have a correct value for the height and width of the portion that we want to use. Now, how can you get the exact values? Is it by estimation and trial and error?
Luckily, there are many web services that automatically generate the CSS background positions of image sprites. An example that will be discussed in this module is http:// www.spritecow.com/. To use the website, upload the image and select the area that you want to generate a CSS code for. The CSS code will show at the bottom of the page.
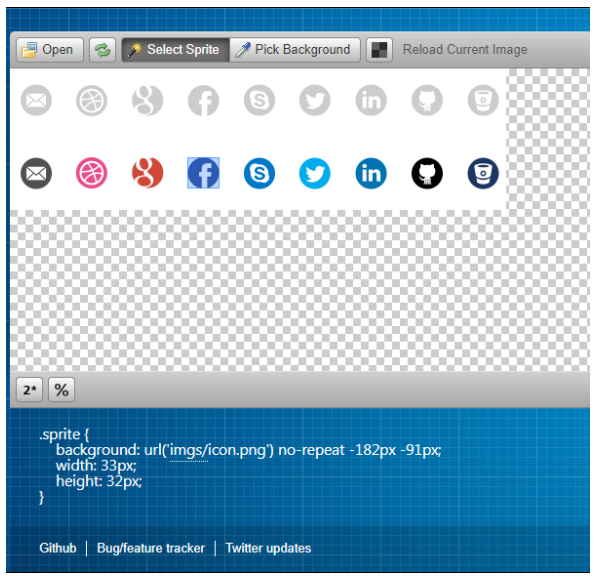
Figure 3. www.spritecow.com

4. Application 2: Using image sprites for animation
Another way that image sprites can be used is in simple animation. To implement this, you need to read more on CSS Animations. But do not worry! This section will give you a simplified explanation of CSS animation features in the context of image sprites.
Let’s say that we want to animate the image in Figure 4. It is a frame by frame shot of a girl walking with arms swinging.

Figure 4. A walking girl
- <head>
- <style>
- .sprite {
- background: url('walking.jpg') no-repeat 0 0;
- width: 97px;
- height: 124px;
- animation: varName 1s steps(4) infinite;
- }
- @keyframes varName{
- from{background-position-x:0px;}
- to{background-position-x:-405px;}
- }
- </style>
- </head>
- <body>
- <div class="sprite"></div>
- </body>
Code explanation:
Let us focus on this line of code under the .sprite selector:
animation: varName 1s steps(4) infinite;
- animation – a CSS selector that has four values
- varName – a variable name to be used later for the definition of animation direction. It can be any string (use variable naming conventions you have learned in programming)
- 1s – the duration of the whole animation, from beginning to end. A longer duration will
lead to a “slower” animation, while a shorter duration will give a faster animation.
- steps(4) – the number inside the parenthesis is the number of frames that you have in the image sprite. In Figure 4, we have 4 frames.
- infinite – the number of iterations for the animation. The value infinite means to loop the animation. A numerical value means to loop the animation for that set number of times.
@keyframes varName{
from{background-position-x:0px;}
to{background-position-x:-405px;}
}
The second part of the CSS code is the animation rule. Notice the use of varName as a selector.
- from{background-position-x:0px;} states the beginning of the animation.
- to{background-position-x:-405px;} states the ending of the animation. -405px means that the animation will move 405 pixels to the right. 405 pixels is the whole width of the image in Figure 4. If you want to animate all the frames in an image sprite, set the value for this property to the width of the whole image (with a negative sign).
To view the animation for Figure 4, copy-paste the code on a text editor, save it as an HTML
file, and open the HTML file in your browser. Feel free to experiment with the animation values to
create more effects on the animation.
5. Summary and References
Summary
Web pages can reach large file sizes because of images and other graphical components. To
reduce the number of separate files that could result in multiple client requests, images are combined
into a single, bigger image. A single image only requires one client request for the web page to load
all images. This single image composed of multiple images is called an image sprite.
The needed images are displayed by defining the portion of the image sprite that contains the image.
References
Coyier, C. (2017). Css sprites: what they are, why they're cool, and how to use them | css-tricks. CSSTricks. https://css-tricks.com/css-sprites/.
CSS Animations. (n.d.). https://www.w3schools.com/css/css3_animations.asp
CSS Image Sprites. (n.d.). https://www.w3schools.com/css/css_image_sprites.asp
Images used:
Social media icons - https://icon-library.com/icon/icon-sprite-26.html
Walking girl - https://www.iconspng.com/image/68214/walking-girl-2-sprite-sheet
Flying bird - https://www.kissclipart.com/sprite-clipart-sprite-animation-clip-art-x2wcec/