HTML Form tags, Form, input (radio, checkbox) and select
2. Radio Buttons
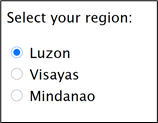
These buttons are used to give the user a list of related items where he/she can choose only one value at a time. The user can click on any item and when they click another item, the latest item clicked will be the chosen value.
The code below shows an example of the use of radio buttons with three choices. Notice in the code that all three options have the same name. All options that have the same name means that these choices are grouped together. Only one item from a group with the same name can be chosen at any given time.
Notice also the use of the form tag <label>. As was discussed during the previous module, this tag is used to define the input areas in a form. For the for attribute, use the id of the option that you want the label to refer to. In this case, when a user clicks on a label, it selects the radio button associated with it.
The value attribute indicates the value of that item in the set. In the code below, when the first option is selected, the form will return a value of “luzon” as the input of the user. This is not visible to the user. The only visible text for the user is the text inside the <label> tag or any text after the <input type = ”radio”> tag.
Sample code:
<form>
<p>Select your region:</p>
<input type="radio" id="luzon" name="region" value="Luzon">
<label for="luzon">Luzon</label></br>
<input type="radio" id="visayas" name="region" value="Visayas">
<label for="visayas">Visayas</label></br>
<input type="radio" id="mindanao" name="region" value="Mindanao">
<label for="mindanao">Mindanao</label>
</form>
Sample output: